also featured on Houzz
KRISTIN HEGGEM LANDSCAPE ARCHITECT KHLA, LLC
  • Home
  • Portfolio
  • About
  • Contact
  • Blog

Cost-Share Stipend Guidelines for Colorado Springs WUI

5/7/2025

0 Comments

 
Picture
Picture
0 Comments

Regenerative Landscaping

12/30/2024

0 Comments

 
During these past years of drought, we’ve tried to reduce outdoor water use by landscaping with drought-tolerant and native plants. These plants not only require less water, but are also visually pleasing when done correctly. This method is known as Xeriscaping. While plant selection is crucial, it's also extremely important to improve soil conditions that support plant health, using methods that encourage long-term sustainability, and that will help restore the fertility of the soil. 
Regenerative Landscaping goes beyond drought-resistant landscapes. While Xeriscaping focuses on using less water but still keeping plants healthy during drought, Regenerative Landscaping thinks more holistically for the long term, using methods that improve soil conditions that help with long term sustainability and restoration of the environment. You may have heard of Regenerative Agriculture where farmers are incorporating these same principals in order to deliver more nutritious crops while improving the soil.
There are 8 principles of Regenerative Landscaping: Act Local, Reduce Waste, Nurture Soil, Sequester Carbon, Save Water, Conserve Energy, Protect Water/Air, and Create HabitatThis a holistic approach to landscaping where we go beyond sustainability and move into regeneration. Plants continually absorb carbon from the atmosphere through the process of photosynthesis, and create oxygen that is released back into the atmosphere. The upper few feet of soil can store carbon absorbed from the atmosphere and by increasing organic matter in the upper soil, we can remove more of carbon from the atmosphere, with the goal of balancing the levels of oxygen and carbon dioxide in our ecosystem.
Other long-term benefits include improved plant health and resilience against pests, disease and extreme climate conditions. Less water usage helps reduces runoff and soil erosion and improves soil conditions for future plantings. Drought-tolerant and native plants improve air quality by absorbing carbon dioxide from the atmosphere, and also enhance habitat for bees and other beneficial insects and pollinators.     
In Colorado, most plants in our landscapes require supplemental irrigation, and the most efficient method is drip irrigation...delivering water slowly at the ground surface which waters only the roots, avoids avoids water loss due to wind and evaporation, doesn't water between plants where it's not needed, and allows the water to penetrate deeply below the surface. 
Consider Regenerative Landscaping for your property...improve the soil, select appropriate plants, and water wisely!
0 Comments

USDA’s Updated Plant Hardiness Map

12/14/2023

0 Comments

 
Picture
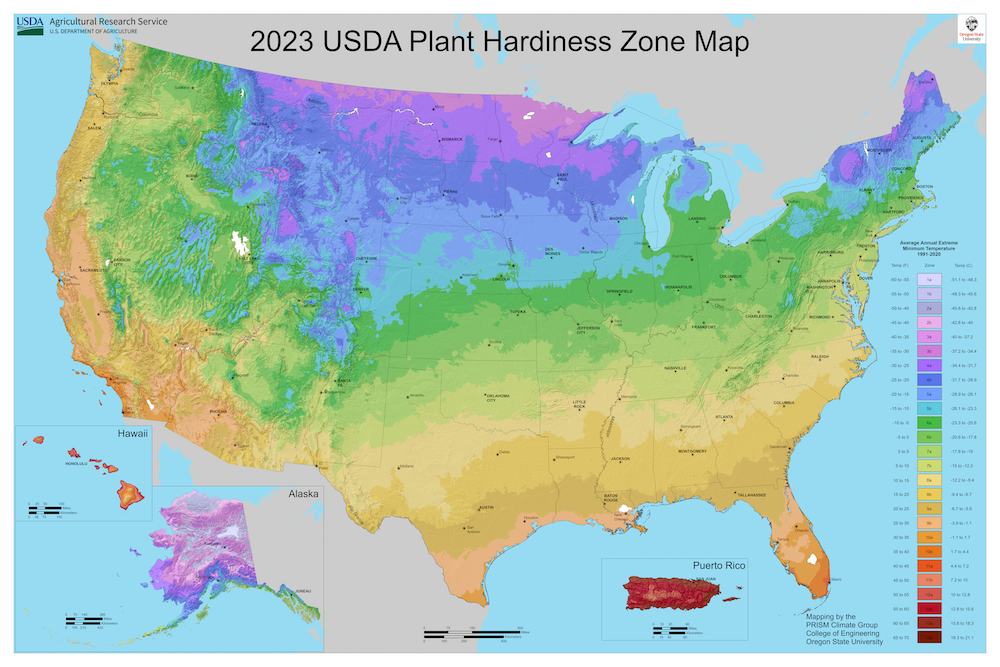
The 2023 map is about 2.5 degrees warmer than the 2012 map across the United States.
Knowing the precise time to get annual plants into the ground and whether or not a perennial will grow in a given location is often buried in local community lore, but the US Department of Agriculture’s plant hardiness zone map is used by millions of growers to help determine which plants are likely to thrive in a location. 
This first version was released in the early 1900s and refined multiple times. In 2012, the map received a massive overhaul backed by a novel climate modeling tool. And last week, the USDA unveiled its newest update, which underscores a warming trend perceived by many growers. 
“The 2023 map is about 2.5 degrees warmer than the 2012 map across the contiguous United States,” said Dr. Christopher Daly, a senior professor at the university and the founding director of Oregon State University’s Climate Group, which developed the map with the USDA. “This translated into about half of the country shifting to a warmer five-degree half zone, and half remaining in the same half zone. The central plains and Midwest generally warmed the most, with the southwestern US warming very little.”
Daly helps the USDA generate the widely used plant hardiness map using a system known as the Parameter-elevation Regressions on Independent Slopes Model (PRISM). This knowledge-based system interpolates climate elements in complex landscapes using data such as temperature, precipitation and other climatic factors, generating a continuous grid of weather estimates on a monthly, yearly or event-based basis. 
“I’ve been interested in topography, mountains, valleys, rivers, coastlines and how they affect the environment around me,” says Daly. “I took what I knew and learned to do that and developed the first version of PRISM.” Before this model, he found no reliable digital tools that mapped the climate in these complex landscapes. Continuing his research at Oregon State, Daly began to look at rain shadows along the Cascade and Sierra Nevada mountain ranges. His research led to the birth of PRISM. 
“That was back in the early nineties,” says Daly. “It’s been improved and updated for the last 30 years and we’re still using it today.”
PRISM remains unique as it combines topographical data with expert knowledge of complex climate extremes and averages. The model is widely used and remains the highest-quality spatial climate data available. As the burning of fossil fuels such as gas and coal warms the planet, developing precise and accurate climate maps and data has become more important to growers and the economy.
One of the major changes in this year’s edition of the hardiness map is the zone boundaries. The USDA states that the new zones are generally about one-quarter-zone warmer than reported in 2012 throughout much of the United States. This is directly related to a more recent averaging period and warming. However, it is also attributed to additional data sources and improved interpolation. PRISM pulled data from 13,412 weather stations, almost 5,000 more than the 2012 data set. One thing that surprised Daly when the map was finalized and compared to the previous version was that it did not change as much as recent climatic warming would suggest. But, he said, “I think in the end we will see warming zones creep northward.”   

Across the country, cooperative extensions exist for advice on anything plant-related. These local hubs empower farmers, ranchers and gardeners to meet challenges in growing plants. With a science-based approach, extensions are a great resource for local growers. This includes the volunteer-run master gardener program. Rachel McClure, coordinator of the Master Gardener Program at the University of Nevada, Reno, is just one example of the resources available to communities. 
“The USDA plant hardiness zone map gives us an idea of our average high and low temperatures,” says  McClure. She comes from a horticultural family and manages about 100 volunteer master gardeners across northern Nevada. “We have contact with thousands of community members every year and recommend this as a source to many people.”
The map is revised every 10 to 12 years by the USDA and reflects data from thousands of weather stations. Being a virtual map, it enables users to examine hardiness zones at a finer scale than before. “This is such a useful tool to home gardeners and everyone alike that it is interactive, and if you go to the web page, you can put in your state and get specific information,” says McClure. The interactivity includes a ZIP code zone finder, allowing users to zero in on their precise location.
“All our home gardeners and users of this map must know that it’s not absolute, it is a general guideline,” says McClure.  She adds that Mother Nature is tricky and has a sense of humor, often to the dismay of eager spring gardeners. She echoes Daly in stressing that there are microclimate differences among elevation changes, bodies of water and urban areas. Even across large properties, growers should learn to find cool pockets. As a general tool, though, the map is a wonderful source of knowledge for gardeners and the economy.
“Horticulturalists use the zones also when they’re developing new plants; plant breeders use them a lot to determine which zones they would like to access in terms of markets and they look to our map to see what the cold tolerance would have to be for a plant to be able to survive in that zone,” says Daly. “We want to give gardeners, horticulturalists and others the best information that we can; there’s a lot of economics riding on these maps.” For growers, nurseries, plant breeders and even the USDA Risk Management Agency, the map provides a solid baseline of data and information.
PRISM’s data gets reviewed by a group of horticultural, botanical and climatological experts who then offer feedback and insight to Daly and his research team. From there, he builds the interactive digital map that represents a balance between year-to-year weather fluctuations and the differences between weather and climate, as far as plants are concerned. The same period of data, 1991 to 2020, is the same window that climatologists use to describe normalities in the climate, increasing the robustness of modeling.
“Climate is what you have in your wardrobe, and weather is what you wear today,” explains Daly. This distinction is important when studying the climate and weather. Climate looks at long-term trends to make predictions. PRISM succeeds at this very thing when running weather models. “Because the climate and the plant hardiness statistic is kind of like a weather statistic, it’s that coldest weather that occurred each year where the climate would be a long-term average over many days and years.”
For perennials, these averages are what matters. The finer scale provided by the new map will help growers better understand the data. “Generally speaking, the USDA hardiness zone map gives us a parameter to set,” says McClure. “And if we plan our gardening around those things, more often than not, it will help us be successful.” 

article by 
Richard Bednarski at the Modern Farmer publication 
https://modernfarmer.com/2023/11/usda-updated-plant-hardiness-map/?utm_medium=email&_hsmi=286576790&_hsenc=p2ANqtz--sY-E6tx8JGaFn0wfTzkGWSMLhw-FlS_nBfCHA8ern0j24-702imz9gzDvtsnYrf4ZAqFdCrPWRDRRkmV5BVzgRtiP9Q&utm_content=286576790&utm_source=hs_email

0 Comments

Bee-pocalypse

8/31/2023

0 Comments

 
Picture
Restrictions on neonics is a start. A ban on all uses would be better.On the last day of Colorado’s 2023 legislative session, Senate Bill 23-266 was signed by leaders of the state Senate and House. The bill limits the sale of a class of pesticides, neonicotinoids, or “neonics,” which are known for killing bees and other pollinators. The governor signed the bill a little over one week later, making Colorado the ninth state in the country to take steps against neonics.
Specifically, SB-266 requires the Colorado commissioner of agriculture to designate neonics as a “limited use pesticide.” Only licensed dealers will be authorized to sell neonics, which excludes the average home and garden store, significantly reducing the use of neonics in residential areas.
Neonics are the most common class of pesticide in the world, even though several studies suggest neonics provide negligible economic benefits to corn and soy crops. Neonics are often applied via seed treatments, which distributes the chemical throughout the entire plant as it grows. As a result, neonics cannot be washed off the surface of plants prior to eating. This quality, combined with their ubiquity, is perhaps the reason that neonics are the most prevalent pesticide in infant and baby food. While there are documented cases of neonics’ toxicity to humans, there is no scientific consensus regarding the chemicals’ threat to human health.
However, neonics’ toxicity to bees, our food supply, and the country’s economy is very well understood.
Bees pollinate 75% of the fruits, nuts and vegetables in the United States, and contribute $24 billion to the U.S. economy. Bees are often exposed to neonics while gathering pollen or drinking nectar from crops in agricultural fields, clover on golf courses, and even ornamental flowers in residential neighborhoods. If the bees don’t consume a fatal dose, the poison interferes with key grooming and sleep behaviors, leading to a slow death or lack of reproduction.
The number of bees in Colorado has declined by more than 70% in the past 20 years. Bee populations have been decimated by pesticides, habitat fragmentation and competition with invasive species, such as the European honey bee.
Although it’s an important agricultural pollinator, the familiar European honey bee is not representativeof our country’s incredible bee diversity. And the notoriety of honey bees obscures the real bee-pocalypse occurring in the U.S. and Colorado: native bees’ slow descent into extinction. Colorado alone has 950 native bee species, placing the state in the top five for most biodiverse bee habitats in the country. Because Colorado’s native bees, including bumblebees, sweat bees and leaf-cutting bees, do the yeoman’s share of pollinating native plants, their fate will affect all of Colorado’s ecosystems. That’s why Colorado’s induction into the club of states working to restrict neonics is vital.
Eight states besides Colorado restrict the use of neonics, either by legislative or administrative action. The restrictions vary in scope — some apply only to residential areas and others, such as in New Jersey, prohibit the use of neonics on lawns, golf courses, and more. There have been no successful bans on the use of neonics in agriculture.
If history is any indication, there’s little chance that the agriculture industry will ever be subjected to neonic restrictions. The powerful agriculture lobby has doggedly avoided environmental regulations for decades, paying for exemptions from the Clean Water Act, and securing reporting exemptions from the Emergency Planning and Community Right to Know Act. That nearly half of Colorado’s land is devoted to agriculture underscores the importance of SB-266 — if state leaders can’t make Colorado’s farms safe for bees, it’s imperative that they target low-hanging fruit by discouraging the use of neonics in residential areas.
SB-266 isn’t a complete reprieve for our state’s bees, but it is a start. What’s the next step? Hopefully, a ban on all uses of neonics, except for the stubborn agriculture industry.
Article re-printed from June 6. 2023 article in Colorado New Online article by Sammy Herdman. Photo credit: Erin Anfinson/NPS/Public domain

0 Comments

Doggone Good Yards too!

7/31/2023

0 Comments

 
Let the dogs out
The yard is another area where dog-friendly features are popular with homeowners. Kristin Heggem, a Colorado Springs-based landscape architect, has designed several yards with dogs in mind and says she usually starts by thinking about surface materials. “What the dog’s paws are going to be walking on will be important,” she says. “Dogs are always barefoot.”
Grass is ideal for dog paws. While many people opt for blue grass and hybrid lawns, Heggem herself has Dog Tuff Bermudagrass, which she says is durable and more resistant to dog urine. The main drawback of the grass, however, is that it has a shorter green season. “It’s the last to green up in the spring and it goes dormant faster in the fall, so there’s a trade-off there,” she says. “But I personally love it.”

Native grasses are better for saving water, but Heggem says they’re not always great for dog areas. “Those types of grasses don’t withstand a lot of heavy paw traffic,” she says.
Artificial turf is more durable but not always pleasant for dogs. “Some types of artificial turf tend to heat up, and you would never want to walk on them barefoot,” she says. However, Heggem says some newer types of turf have been engineered to stay cooler for dogs. If using turf, proper installation is key to keeping it clean and odor-free. Heggem says there should always be a base layer of drainage rock before the turf goes down.
Mulches can be good for attracting dogs as well as keeping them away. Wood mulch is paw-friendly and can be placed in areas where dogs are welcome, while rock mulch is good to use in areas owners would like their dogs to avoid. Heggem warns to never use ground tire mulch, though, which is toxic to dogs.
Paying attention to what’s planted and where is also important in a dog-friendly yard. Dogs like to patrol property lines, Heggem says, so it’s smart to leave room for that. “You just want to leave some clear space between the fence and your nearest planting,” she says. “If you plant things in that zone, they’re going to trample it.” Consider the size of the dog when leaving room between plantings and the fence: Heggem says medium-size dogs need about three feet.
Lists of plants that are toxic for dogs are available online, and it’s best to consult them before adding anything to make sure all plants in the yard are safe. Heggem stays away from all yews. “Every part of that plant is poisonous for dogs,” she says.
Beyond plants and mulches, there are endless ways to customize a yard for a dog’s enjoyment. Homeowners Heggem has worked with have added dog agility areas, heated patios for the winter and puppy portal windows in the fence—mounted at the perfect height for the family’s dogs—so they could look out at people. Heggem says nothing’s required to be fancy though. “Anything that provides some sort of entertainment value for the dog is great – it’s just something for them to crawl up on or get into,” she says. “My dog likes to just sit on my patio furniture.”

This is an except from Colorado Builder magazine, article written by Corey Dahl, July 28, 2023. Find the full article here:
​https://coloradobuildermag.com/outdoor/design-build/dog-friendly-homes/?utm_source=LinkedIn&utm_medium=social+media&utm_campaign=7%2F31%2F23&utm_id=Doggone+Good+Homes

0 Comments

2022 Historic Preservation Alliance Award

10/17/2022

0 Comments

 
October 6, 2022
Re: 1409 Wood Ave., The Clancy Residence
​
All of our (TDG Architecture) best projects start with great clients- The Clancy's helped guide and design this project
with us. This example of a Shingle style Victorian, constructed in 1899, has great street façade with a dominant
corner turret and an octagonal dormer rising from a side-gabled roof. The rear of the house, on the other hand, had
a much later addition that had become a bit dated on the exterior and did not address the contemporary way of living
or the character of the original house.

The Clancy's came to us with ideas to remodel the interior with a larger consolidated kitchen and outdoor deck on
the main level and a new main bedroom suite on the second floor. We knocked down walls and added exposed steel
to create a large kitchen using the original rear footprint of the house. An existing outdoor deck off of the new kitchen
was redesigned to be covered, have a fireplace, and radiant heat to extend its use throughout the year. Upstairs,
two bedrooms and a bath were combined to a new main bedroom suite and another bath enlarged for the other two
bedrooms. Using traditional shingle style elements as inspiration, we created a private deck with off of the new
second floor bedroom suite combining a fireplace into the chimney of the fireplace below and walls as the railings
finished on the exterior with a curved roof, referencing the side-gabled roof eaves of this house. Contemporary
materials were combined with traditional materials to make this addition be a part of this time and relate to the past.
Contrasting and blending the new and the old were the goals of the project both inside and out.

The contractor, John Hockman with Prospect Builders, sourced hard-to-find materials to closely match existing
materials and used current, beautifully crafted, construction techniques to realize the design intentions of the team.
Landscape architect Kristin Heggem was brought in to redesign the site and with her input a patio was added to the
exterior of the covered deck and a fireplace added to the exterior base of the main deck chimney and a side deck
added to create a outdoor space and transition from the covered deck down onto the patio.

A great team resulted in a beautifully built, awesome project.

Rick Hibbard
Project designer
TDG Architecture
0 Comments

Is a microclover lawn right for you?

9/16/2022

0 Comments

 
Picture
Microclover (also referred to as miniclover) just may be the next big thing in lawn alternatives. Originally produced in the Netherlands and Denmark for use in golf courses, microclover offers homeowners a viable option in low maintenance landscaping. 
What is microclover? Microclover (Trifolium repens var. ‘Pipolina’ or ‘Pirouette’) is a miniature version of the Dutch white clover which was prevalent in household lawns up until the 1950's, when herbicides began targeting broadleaf plants. Its tiny leaves are about one third the size of traditional clover, and it doesn’t clump together, making it look less like a weed and more like the even green lawns people love. ​These types have smaller leaves, fewer flowers, and a lower growth habit compared to Dutch white clover. They also have a less aggressive clump-forming habit.


Picture
White clover often shows up in lawns by way of seed dispersal. All clovers are legumes, which means that through a symbiotic relationship with Rhizobium soil bacteria, legumes are able to transform atmospheric nitrogen gas into an organic form of nitrogen (fertilizer!) that can be used by plants. Clover is a valued component of lawn seed mixtures for its ability to fix nitrogen (thus reduce nitrogen fertilizer applications), enrich the soil, improve lawn growth, and provides food for bees.
​

Over-seeding vs. New "lawn" 
Adding microclover to lawns helps control weeds because it helps fill in gaps that often exist in conventional lawn blends. The nitrogen-fixing properties of clovers build nutrients in the soil and feed other grasses in the blend, leading to a thick, dense cover. If you plan to seed microclover into an existing lawn, be sure to mow close to the soil surface and aerate first. This will introduce air, water, and nutrients into the soil and give your seed a better chance of taking hold. Because clover seed is tiny, it passes between blades of grass quite effectively, but it's necessary to sow 25% more seed than you would a bare lawn to account for those that don’t penetrate to the soil level. Apply a bit of topsoil over the seeded area to improve germination rates, rake lightly, and press. The typical sowing rate for adding microclover to an existing lawn is 1.5 pounds for 10,000 square feet.

Picture
When planting a new microclover "lawn", prepare the top 4 to 6 inches of your soil (sandy loam is preferable) by tilling and adding Class 1/weed-free compost. Use lime where necessary to adjust the pH of the soil to 6-7. Rake to ensure an even surface, then use a seed spreader, reserving some seed to fill in any gaps that develop after germination. Water regularly to ensure your soil doesn’t dry out. Fertilize per seed suppliers recommendations. This will give your seeds a chance to germinate and avoid giving the weeds a head start. The typical sowing rate for a new microclover "lawn" is 1 to 2 pounds for 1,000 square feet.


​Coated or uncoated seed

Microclover seed is available as coated and uncoated seed. Coated seeds contain the essential bacteria that clover needs to effectively fix nitrogen. In many cases, these bacteria are already present in the soil and coated seed isn’t necessary, but if your soil is sterile, has never grown nitrogen-fixing plants before, or you just want to give your clover a jumpstart, consider using seed coated with the bacteria known as Rhizobium leguminosarum biovar. Trifoli. The coating also helps the handling and seeding process much easier.

Weed Control
If undesirable weeds appear, do NOT treat with any broadleaf herbicides as these will kill microclover. Instead, prevent weeds from colonizing your lawn by starting with clean, amended soil with the correct pH. Obtain a soil analysis test  from CSU (https://agsci.colostate.edu/soiltestinglab/) before planting.  If weeds appear, they MUST be pulled by hand!

Other Considerations
•The recommended planting time is 4-6 weeks before your average first frost date in Fall, or as early as two weeks before your last frost date in Spring. Microclover prefers cooler temperatures for germination and growth, so spring and fall are the best time to plant.
​•Microclover is cold hardy, and grows well in zones 3, 4, 5, 6, 7, 8.
•Microclover needs 4 to 6 hours of sunlight every day...too much shade will cause microclover lawns to struggle. 
•Microclover is fairly drought tolerant, requiring about 25% less water than conventional lawns to stay green. When first planted, water daily to keep soil moist, speed germination and help establish a strong root system. Once seedlings appear after about 2 weeks, watering can be reduced to every 2-3 days. Once fully established, water deeply (cycle and soak method) as microclover has deep roots which helps with its drought tolerant qualities. 
•You can walk on microclover after it’s established, and has a good root system developed. Microclover is more tolerant of light foot traffic than many other lawn alternatives. 
•Mowing microclover is important because it encourages the plants to keep their characteristic tight, miniature habit. Once you achieve the size and look you’re going for, you can reduce mowing to as little as once per month—or mow weekly for more compact growth and to control blossoming.
•Microclover will stay green from spring through fall, but in Colorado winters, it will go dormant and turn brown.
•Bees are attracted to the flowers which may be undesirable for people with bee sting allergies. Microclover can be mowed to remove the flowers.

0 Comments

Lawn Rennovation

9/15/2022

0 Comments

 
by A.J. Koski and C. Wilson from CSU Extension (https://extension.colostate.edu/topic-areas/yard-garden/renovating-the-home-lawn-7-241/)
Quick Facts…
  • Lawns that are thin from drought, pests or increasing shade may benefit from renovation.
  • Take advantage of total lawn renovation to introduce a species or variety that gives better drought resistance and water use efficiency, increased pest resistance, and better lawn appearance.
  • Only certain grass (and clover) types are compatible for overseeding existing lawns.
  • Newly seeded areas require different care than established lawns.
What is lawn renovation? Total Lawn renovation involves killing existing turf and replacing it with new grass without tilling or changing the grade which is normally done during the establishment of a new lawn. Partial lawn renovation may also include the items listed below.
  • Introduce a new or improved variety of the same turfgrass species into an existing lawn. For example, seeding a new bluegrass variety into an existing bluegrass lawn.
  • Introduce a similar-looking species into an existing lawn such as perennial ryegrass in a bluegrass lawn.
  • Introduce a variety of clover for added nitrogen-fixing and drought tolerance.
Why renovate a lawn?
You may want to consider renovating a home lawn if:
  • the lawn species or variety is frequently attacked by disease or insects and it has caused the lawn to thin out,
  • the landscape has become increasingly shady over time and the original lawn is thin and unhealthy,
  • the lawn was severely injured or totally killed by disease, insects, or drought, or if it was winterkilled, or if you want to completely convert from one turf species to another.
  • More drought tolerance is needed.
When is the best time to renovate a lawn?
The timing for lawn renovation varies according to grass type and elevation of the site. For the most success, follow the guidelines below.
  • Seed cool-season grasses (bluegrass, ryegrass, fescues) anytime from March through September. Along the Front Range and Western Slope the optimal time is mid-August to mid-September.
  • Seed warm-season grasses (buffalograss, blue grama) April through July. Seeding after July is not recommended.
  • At high elevations (greater than 7,000 feet) do not use warm-season grasses. Cool-season grasses can be seeded in the spring, as soon as temperatures begin to warm.
  • Seeding after the first fall frost is not recommended, as young seedlings may be winterkilled. It is better to wait until the following spring to practice lawn renovation.
How to Renovate a LawnFollow these steps to renovate a lawn
  1. Kill existing grass and weeds. 
  2. Resume watering for 10 days. Kill any areas or weeds that are still green.
  3. When the existing vegetation is dead, mow the site to 1/2 inch and remove the debris by hand raking or using the bagging unit on your lawn mower.
  4. If there is an existing thatch layer (a matted layer of organic matter on the soil surface) thicker than 1 inch, remove it from the lawn (a sod cutter makes thatch removal easier).
  5. A thatch layer less than 1 inch is okay, but the soil must be exposed.• Core cultivating provides an excellent seed germination environment. Holes should be 1 to 3 inches deep and 2 inches apart in all directions.• A power rake, set deep enough to expose the soil, can also be run over the lawn in two different directions. Remove loose debris by raking or using a bagging unit attached to your lawn mower.
  6. Spread seed on exposed soil to allow for good seed to soil contact.
  7. Seed at the label’s recommended rate with a drop spreader in two different directions. Follow with a light raking to work the seed into the soil. Adding topsoil or sand after seeding is NOT recommended.
How to Care for New SeedNewly seeded areas require different care than established lawns. Follow the recommendations below.
  • Apply starter fertilizer at the rate recommended on the label.
  • Irrigate the area should to maintain a consistently moist (but not saturated) soil.
  • Check moisture levels in the underlying soil to prevent excessive irrigation.
  • Grass will germinate and grow more vigorously in aerification holes or slits made by the power rake.
  • Begin mowing the lawn when it has grown to about 2 1/2 inches.
  • Keep traffic, including children and pets, off of the lawn as much as possible, until the lawn has been mowed a few times and the new grass begins to mature.
Things to AvoidSome practices result in little benefit for the time and effort required.
  • Don’t scatter seed on an unprepared lawn surface. Poor soil preparation is one of the chief reasons for seeding to fail.
  • Don’t buy cheap (low quality, weedy) seed.
  • Don’t use preemergent herbicides before, during or after the renovation process. It’s best to wait one year before doing this.
  • Don’t spray herbicides for the control of visible weeds on the new lawn until it is mowed five to six times. Do not use herbicides at all if clover has been seeded.
  • Don’t over-fertilize to make the new lawn grow faster.
  • Don’t let new grass get too tall before mowing. Begin mowing when it reaches 2 1/2 to 3 inches tall and mow it to a height of 2 to 3 inches.
Types of Seed
  • If the old lawn grass is still alive, the overseeded grass can be somewhat similar in appearance to the existing species, or clover an be mixed in. Microclover will blend in better than Dutch clover as it's leaf size is smaller.
    • Seeding ryegrass into bluegrass is okay.
    • Seeding fine fescue into bluegrass is okay.
    • Don’t seed tall fescue into bluegrass.
    • Don’t seed buffalograss into bluegrass, ryegrass or tall fescue.
    • Don’t seed bluegrass, tall fescue or ryegrass into buffalograss.
  • When the old lawn dies, use the best adapted grass for the situation. Contact your local Colorado State University Extension county office for advice on species and variety selection.
  • Purchase seed that shows 0 percent weed seed on the label.
How Much Seed to UseToo much or too little seed produces inferior results. Grass species should be seeded at the following rates:
  • Kentucky bluegrass: 3 to 4 pounds/1,000 square feet
  • Perennial ryegrass: 7 pounds/1,000 square feet
  • Turf-type tall fescue: 7 pounds/1,000 square feet
  • Fine fescues: 5 pounds/1,000 square feet
  • Buffalograss: 3 to 5 pounds/1,000 square feet
  • Miniclover®: 1 to 2 pounds/1,000 square feet
Sod vs. SeedSod is best used to establish new lawns, but it can be used for renovation if existing vegetation is removed and the underlying soil is tilled or core cultivated (aerified). Successful sodding requires good soil to sod contact, which promotes better sod rooting.
  • Do not lay sod on an existing lawn or where there is a thatch layer.
  • Sod should not be laid on heavily-compacted soil.
Lawn Renovation Checklist
  • Decide if the lawn requires total renovation (killing/solarizing) or only overseeding.
  • Determine what species and varieties will be used.
  • If a thatch layer is not a problem, mow dead lawn vegetation to 1/2 to 3/4 inch and remove all loose vegetation.
  • If a thick thatch layer (thicker than 1 inch) is present, remove with a sod cutter.
  • Aerate the lawn heavily, so the holes are approximately 2 inches apart and 1 to 3 inches deep; OR run a power rake over the lawn in at least two different directions to expose the soil for seeding.
  • Use a drop seeder to apply seed at the recommended rate. Spread seed in two different directions.
  • Lightly rake the seeded surface, or run over the lawn with a power rake.
  • Apply a starter fertilizer at the recommended rate.
  • Irrigate to keep the soil surface consistently moist, but not saturated.
  • Keep traffic to a minimum.
  • Avoid using herbicides after the lawn is seeded and until it has been mowed five to six times. Do not use herbicides at all if overseeded with any type of clover.
  • Begin mowing the new lawn as soon as the grass has grown to 2 to 3 inches.


0 Comments

The Social and Economic Benefits of Green Schoolyards

6/3/2022

0 Comments

 
New research suggests that switching from asphalt to green, park-like schoolyards brings economic benefits in addition to public health improvements.
“A new study from Trust for Public Land effectively dispels a common misconception among school administrators about the price tag of transforming asphalt-covered and treeless schoolyards into green schoolyards,” according to a press release from TPL. “The study compared the typical cost of building and maintaining a traditional ‘gray’ or asphalt-covered schoolyard in California to a ‘green’ schoolyard (replacing asphalt with more natural green space and infrastructure) over a 20-year period. While gray schoolyards had a moderately lower initial renovation cost ($2.3 million compared to $2.6 million for green schoolyards), they yielded no benefits over time, with schools continuing to sink money into resealing asphalt.” By contrast, green schoolyards bring close to $600,000 in net benefits. These include higher student attendance and staff retention, better academic performance, and savings on energy costs.
“The findings make a strong case for schools to stop wasting resources in maintaining asphalt and blacktop – surfaces that create uncomfortable and dangerously hot environments during recess on triple-digit temperature days in Los Angeles – and instead invest them in green schoolyards, which create safer, healthier learning environments for students.”
Green schoolyards can also double as community parks outside of school hours, providing critical green space in park-poor neighborhoods. “Trust for Public Land’s pilot program with the Oakland Unified School District is improving park equity in the area by bringing green schoolyards to five campuses.” In Southern California, Los Angeles Unified School District’s superintendent Alberto Carvalho has pledged to issue a plan for greening the city’s schoolyards.
FULL STORY: Cost-Benefit Analysis: Green Schoolyards Brings Major Benefits, Cost Savings​ (Tuesday, May 24, 2022 in Trust for Public Land)
May 26, 2022, By Diana Ionescu
0 Comments

TREE CANOPY GRANTS

4/13/2022

0 Comments

 
Trees are an important element of streetscape design that bring vitality, vibrancy, and a sense of well-being to the urban environment. They create a pedestrian friendly experience that removes pollutants from the air and soil, reduces the urban heat island effect, provide shade and natural filtration of rainwater, among other benefits.
Tree Canopy Grants are designed to supplement or match funds for properties within the DDA (Downtown Development Authority) that contribute to creating a robust urban tree canopy by enhancing existing or creating new planting areas. Grants are provided on a reimbursement basis after project completion.
All projects receiving grants and reimbursement agreements from the DDA must demonstrate alignment with the goals and priorities of Experience Downtown. Grant funding decisions are made by the 11-member board of the DDA, which meets monthly on the second Tuesday of each month.
To inquire about grant or TIF opportunities for your business, contact SUSAN EDMONDSON  or call 719-886-0088.
For more information: https://downtowncs.com/wp-content/uploads/2022/04/DDA-Tree-Canopy-Grant-Application.pdf
Picture
0 Comments
<<Previous

    Author

    Kristin Heggem is passionate about landscape design, architecture, and travel.

    Archives

    December 2023
    August 2023
    July 2023
    October 2022
    September 2022
    June 2022
    April 2022
    July 2020
    June 2020
    January 2020
    October 2019
    July 2019
    February 2019
    January 2019
    November 2018
    October 2018
    September 2018
    July 2018
    April 2018

    Categories

    All

    RSS Feed

Landscape Architects have been green since 1899