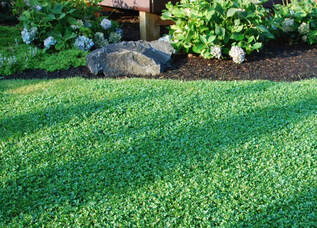
Microclover (also referred to as miniclover) just may be the next big thing in lawn alternatives. Originally produced in the Netherlands and Denmark for use in golf courses, microclover offers homeowners a viable option in low maintenance landscaping.
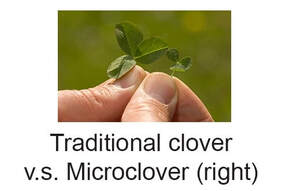
What is microclover? Microclover (Trifolium repens var. ‘Pipolina’ or ‘Pirouette’) is a miniature version of the Dutch white clover which was prevalent in household lawns up until the 1950's, when herbicides began targeting broadleaf plants. Its tiny leaves are about one third the size of traditional clover, and it doesn’t clump together, making it look less like a weed and more like the even green lawns people love. These types have smaller leaves, fewer flowers, and a lower growth habit compared to Dutch white clover. They also have a less aggressive clump-forming habit.
What is microclover? Microclover (Trifolium repens var. ‘Pipolina’ or ‘Pirouette’) is a miniature version of the Dutch white clover which was prevalent in household lawns up until the 1950's, when herbicides began targeting broadleaf plants. Its tiny leaves are about one third the size of traditional clover, and it doesn’t clump together, making it look less like a weed and more like the even green lawns people love. These types have smaller leaves, fewer flowers, and a lower growth habit compared to Dutch white clover. They also have a less aggressive clump-forming habit.
White clover often shows up in lawns by way of seed dispersal. All clovers are legumes, which means that through a symbiotic relationship with Rhizobium soil bacteria, legumes are able to transform atmospheric nitrogen gas into an organic form of nitrogen (fertilizer!) that can be used by plants. Clover is a valued component of lawn seed mixtures for its ability to fix nitrogen (thus reduce nitrogen fertilizer applications), enrich the soil, improve lawn growth, and provides food for bees.
Over-seeding vs. New "lawn"
Adding microclover to lawns helps control weeds because it helps fill in gaps that often exist in conventional lawn blends. The nitrogen-fixing properties of clovers build nutrients in the soil and feed other grasses in the blend, leading to a thick, dense cover. If you plan to seed microclover into an existing lawn, be sure to mow close to the soil surface and aerate first. This will introduce air, water, and nutrients into the soil and give your seed a better chance of taking hold. Because clover seed is tiny, it passes between blades of grass quite effectively, but it's necessary to sow 25% more seed than you would a bare lawn to account for those that don’t penetrate to the soil level. Apply a bit of topsoil over the seeded area to improve germination rates, rake lightly, and press. The typical sowing rate for adding microclover to an existing lawn is 1.5 pounds for 10,000 square feet.
When planting a new microclover "lawn", prepare the top 4 to 6 inches of your soil (sandy loam is preferable) by tilling and adding Class 1/weed-free compost. Use lime where necessary to adjust the pH of the soil to 6-7. Rake to ensure an even surface, then use a seed spreader, reserving some seed to fill in any gaps that develop after germination. Water regularly to ensure your soil doesn’t dry out. Fertilize per seed suppliers recommendations. This will give your seeds a chance to germinate and avoid giving the weeds a head start. The typical sowing rate for a new microclover "lawn" is 1 to 2 pounds for 1,000 square feet.
Coated or uncoated seed
Microclover seed is available as coated and uncoated seed. Coated seeds contain the essential bacteria that clover needs to effectively fix nitrogen. In many cases, these bacteria are already present in the soil and coated seed isn’t necessary, but if your soil is sterile, has never grown nitrogen-fixing plants before, or you just want to give your clover a jumpstart, consider using seed coated with the bacteria known as Rhizobium leguminosarum biovar. Trifoli. The coating also helps the handling and seeding process much easier.
Weed Control
If undesirable weeds appear, do NOT treat with any broadleaf herbicides as these will kill microclover. Instead, prevent weeds from colonizing your lawn by starting with clean, amended soil with the correct pH. Obtain a soil analysis test from CSU (https://agsci.colostate.edu/soiltestinglab/) before planting. If weeds appear, they MUST be pulled by hand!
Other Considerations
•The recommended planting time is 4-6 weeks before your average first frost date in Fall, or as early as two weeks before your last frost date in Spring. Microclover prefers cooler temperatures for germination and growth, so spring and fall are the best time to plant.
•Microclover is cold hardy, and grows well in zones 3, 4, 5, 6, 7, 8.
•Microclover needs 4 to 6 hours of sunlight every day...too much shade will cause microclover lawns to struggle.
•Microclover is fairly drought tolerant, requiring about 25% less water than conventional lawns to stay green. When first planted, water daily to keep soil moist, speed germination and help establish a strong root system. Once seedlings appear after about 2 weeks, watering can be reduced to every 2-3 days. Once fully established, water deeply (cycle and soak method) as microclover has deep roots which helps with its drought tolerant qualities.
•You can walk on microclover after it’s established, and has a good root system developed. Microclover is more tolerant of light foot traffic than many other lawn alternatives.
•Mowing microclover is important because it encourages the plants to keep their characteristic tight, miniature habit. Once you achieve the size and look you’re going for, you can reduce mowing to as little as once per month—or mow weekly for more compact growth and to control blossoming.
•Microclover will stay green from spring through fall, but in Colorado winters, it will go dormant and turn brown.
•Bees are attracted to the flowers which may be undesirable for people with bee sting allergies. Microclover can be mowed to remove the flowers.
 RSS Feed